Python 教程#
在本教程中,我们将按照指南的快速参考部分和更详细的创建第一个 PR 的步骤部分中指定的步骤,为 Arrow 做出实际的功能贡献。如果此处缺少某些信息,请随时导航到这些部分。
此功能贡献将添加到 PyArrow 中的计算模块中。但如果您正在修复错误或添加绑定,也可以按照这些步骤操作。
本教程与创建第一个 PR 的步骤不同,因为我们将处理一个具体案例。本教程并非旨在作为分步指南。
开始吧!
设置#
我们来设置 Arrow 仓库。我们在此假定 Git 已安装。否则请参阅设置部分。
一旦克隆了 Apache Arrow 仓库,我们将其克隆并将主仓库的链接添加到我们的上游。
$ git clone https://github.com/<your username>/arrow.git
$ cd arrow
$ git remote add upstream https://github.com/apache/arrow
构建 PyArrow#
构建 PyArrow 的脚本因您使用的操作系统而异。因此,本教程中我们只会引用构建过程的说明。
为新功能创建 GitHub issue#
我们将添加一个新功能,该功能模仿 arrow.compute 模块中现有的 min_max 函数,但在两个方向上将间隔增加 1。请注意,这是为本指南虚构的函数。
请参阅此链接中 pc.min_max 的示例。
首先,我们需要创建一个 GitHub issue,因为它尚不存在。创建 GitHub 账户后,我们将导航到 GitHub issue 面板并点击新建 issue按钮。
我们应该确保将自己分配给该 issue,以便其他人知道我们正在处理它。您可以通过在创建的 issue 中添加评论 take 来实现。
另请参阅
要获取有关 GitHub issue 的更多信息,请参阅指南的查找好的初学者 issue 🔎部分。
在新分支上开始工作#
在开始添加功能之前,我们应该从已更新的主分支创建一个新分支。
$ git checkout main
$ git fetch upstream
$ git pull --ff-only upstream main
$ git checkout -b ARROW-14977
我们来研究 Arrow 库,看看 pc.min_max 函数在 C++ 中是如何定义/连接的,并了解我们可以在哪里实现新功能。
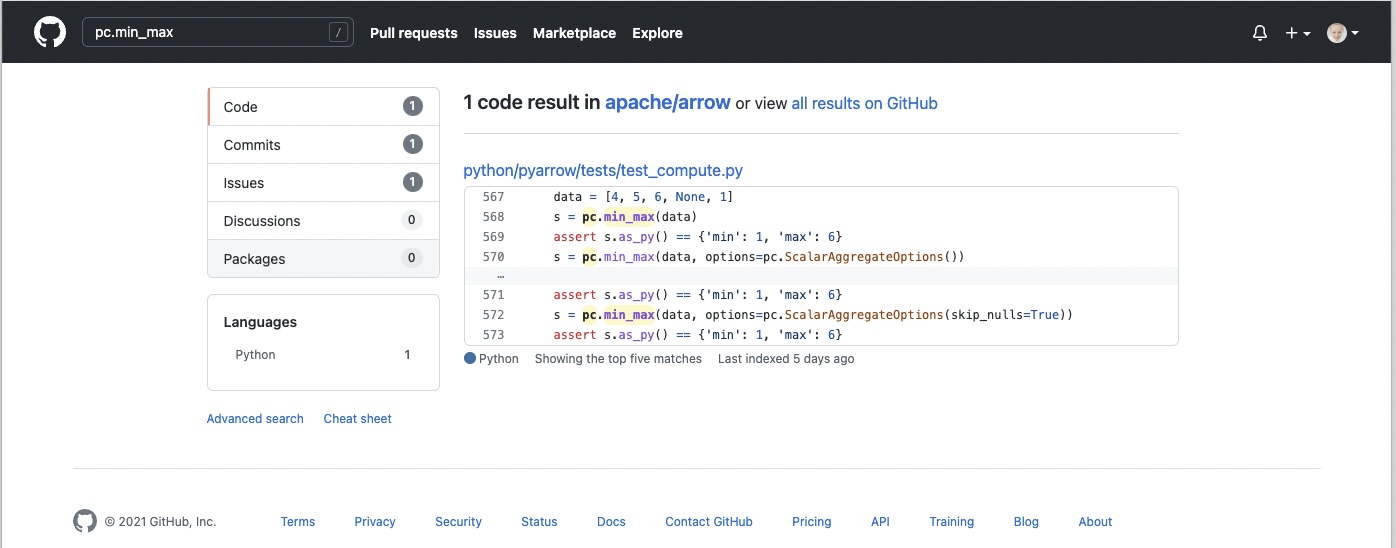
我们可以尝试在 GitHub Apache Arrow 仓库中搜索函数引用。#
并在 pyarrow 文件夹中搜索 test_compute.py 文件。#
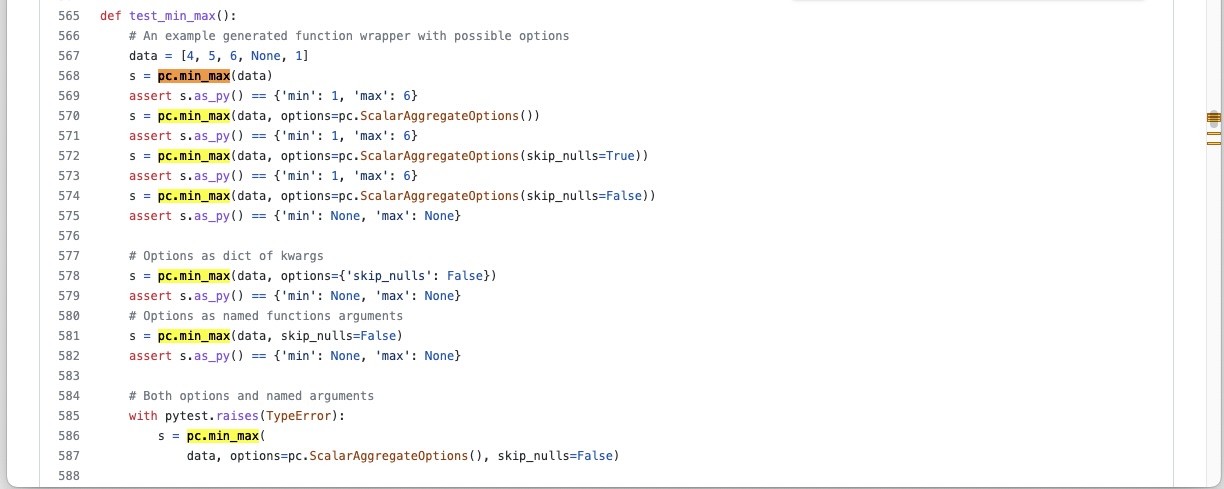
从搜索结果中我们可以看到,该函数在 python/pyarrow/tests/test_compute.py 文件中进行了测试,这意味着该函数在 compute.py 文件中定义。
在检查 compute.py 文件后,我们可以看到它与 _compute.pyx 一起将 C++ 中的函数包装到 Python 中。我们将在 compute.py 文件的末尾定义新功能。
我们从 arrow/python 目录中的 Python 控制台运行一些代码,以了解更多关于 pc.min_max 的信息。
$ cd python
$ python

Python 3.9.7 (default, Oct 22 2021, 13:24:00)
[Clang 13.0.0 (clang-1300.0.29.3)] on darwin
Type "help", "copyright", "credits" or "license" for more information.
我们已经从 shell 进入 Python 控制台,现在可以进行一些研究
>>> import pyarrow.compute as pc
>>> data = [4, 5, 6, None, 1]
>>> data
[4, 5, 6, None, 1]
>>> pc.min_max(data)
<pyarrow.StructScalar: [('min', 1), ('max', 6)]>
>>> pc.min_max(data, skip_nulls=False)
<pyarrow.StructScalar: [('min', None), ('max', None)]>
我们将把新功能命名为 pc.tutorial_min_max。我们希望该函数接受相同的输入数据,其结果为 [('min-', 0), ('max+', 7)]。如果我们指定应包含 null 值,则结果应等于 pc.min_max,即 [('min', None), ('max', None)]。
我们将首次尝试的代码添加到 arrow/python/pyarrow/compute.py 中,其中我们首先测试对 C++ 中“min_max”函数的调用
def tutorial_min_max(values, skip_nulls=True):
    """
    Add docstrings

    Parameters
    ----------
    values : Array

    Returns
    -------
    result : TODO

    Examples
    --------
    >>> import pyarrow.compute as pc
    >>> data = [4, 5, 6, None, 1]
    >>> pc.tutorial_min_max(data)
    <pyarrow.StructScalar: [('min-', 0), ('max+', 7)]>
    """

    options = ScalarAggregateOptions(skip_nulls=skip_nulls)
    return call_function("min_max", [values], options)
为了查看这是否有效,我们需要再次导入 pyarrow.compute 并尝试
>>> import pyarrow.compute as pc
>>> data = [4, 5, 6, None, 1]
>>> pc.tutorial_min_max(data)
<pyarrow.StructScalar: [('min', 1), ('max', 6)]>
它正在工作。现在我们必须修正限制以获得修正后的区间。为此,我们必须对 pyarrow.StructScalar 进行一些研究。在 test_scalars.py 中的 test_struct_duplicate_fields 下,我们可以看到如何创建 StructScalar 的示例。我们可以再次运行 Python 控制台并尝试自己创建一个。
>>> import pyarrow as pa
>>> ty = pa.struct([
...      pa.field('min-', pa.int64()),
...      pa.field('max+', pa.int64()),
...    ])
>>> pa.scalar([('min-', 3), ('max+', 9)], type=ty)
<pyarrow.StructScalar: [('min-', 3), ('max+', 9)]>
注意
在尚未有完善文档的情况下,单元测试是查找代码示例的好地方。
有了关于 StructScalar 的新知识以及 pc.min_max 函数的其他选项,我们可以完成这项工作。
def tutorial_min_max(values, skip_nulls=True):

   """
   Compute the minimum-1 and maximum+1 values of a numeric array.

   This is a made-up feature for the tutorial purposes.

   Parameters
   ----------
   values : Array
   skip_nulls : bool, default True
       If True, ignore nulls in the input.

   Returns
   -------
   result : StructScalar of min-1 and max+1

   Examples
   --------
   >>> import pyarrow.compute as pc
   >>> data = [4, 5, 6, None, 1]
   >>> pc.tutorial_min_max(data)
   <pyarrow.StructScalar: [('min-', 0), ('max+', 7)]>
   """

   options = ScalarAggregateOptions(skip_nulls=skip_nulls)
   min_max = call_function("min_max", [values], options)

   if min_max[0].as_py() is not None:
     min_t = min_max[0].as_py()-1
     max_t = min_max[1].as_py()+1
   else:
     min_t = min_max[0].as_py()
     max_t = min_max[1].as_py()

   ty = pa.struct([
     pa.field('min-', pa.int64()),
     pa.field('max+', pa.int64()),
   ])
   return pa.scalar([('min-', min_t), ('max+', max_t)], type=ty)
添加测试#
现在我们应该向 python/pyarrow/tests/test_compute.py 添加一个单元测试并运行 pytest。
def test_tutorial_min_max():
    arr = [4, 5, 6, None, 1]
    l1 = {'min-': 0, 'max+': 7}
    l2 = {'min-': None, 'max+': None}
    assert pc.tutorial_min_max(arr).as_py() == l1
    assert pc.tutorial_min_max(arr,
                               skip_nulls=False).as_py() == l2
添加单元测试后,我们可以从 shell 运行 pytest。要运行特定的单元测试,请将测试名称传递给 -k 参数。
$ cd python
$ python -m pytest pyarrow/tests/test_compute.py -k test_tutorial_min_max
======================== test session starts ==========================
platform darwin -- Python 3.9.7, pytest-6.2.5, py-1.10.0, pluggy-1.0.0
rootdir: /Users/alenkafrim/repos/arrow/python, configfile: setup.cfg
plugins: hypothesis-6.24.1, lazy-fixture-0.6.3
collected 204 items / 203 deselected / 1 selected

pyarrow/tests/test_compute.py .                                  [100%]

======================== 1 passed, 203 deselected in 0.16s ============


$ python -m pytest pyarrow/tests/test_compute.py
======================== test session starts ===========================
platform darwin -- Python 3.9.7, pytest-6.2.5, py-1.10.0, pluggy-1.0.0
rootdir: /Users/alenkafrim/repos/arrow/python, configfile: setup.cfg
plugins: hypothesis-6.24.1, lazy-fixture-0.6.3
collected 204 items

pyarrow/tests/test_compute.py ................................... [ 46%]
.................................................                 [100%]

========================= 204 passed in 0.49s ==========================
另请参阅
有关测试的更多信息,请参阅测试 🧪部分。
检查样式#
最后我们还需要检查样式。在 Arrow 中,我们使用一个名为 pre-commit 的实用程序来检查代码是否符合 PEP 8 样式指南。
$ pre-commit run --show-diff-on-failure --color=always --all-files python
完成。现在我们来创建 Pull Request!
创建 Pull Request#
首先,我们使用 git status 在 shell 中查看我们的更改,以查看哪些文件已更改,并仅提交我们正在处理的文件。
$ git status
On branch ARROW-14977
Changes not staged for commit:
  (use "git add <file>..." to update what will be committed)
  (use "git restore <file>..." to discard changes in working directory)
   modified:   python/pyarrow/compute.py
   modified:   python/pyarrow/tests/test_compute.py

no changes added to commit (use "git add" and/or "git commit -a")
使用 git diff 查看文件中的更改,以便发现我们可能犯的任何错误。
$ git diff
diff --git a/python/pyarrow/compute.py b/python/pyarrow/compute.py
index 9dac606c3..e8fc775d8 100644
--- a/python/pyarrow/compute.py
+++ b/python/pyarrow/compute.py
@@ -774,3 +774,45 @@ def bottom_k_unstable(values, k, sort_keys=None, *, memory_pool=None):
         sort_keys = map(lambda key_name: (key_name, "ascending"), sort_keys)
     options = SelectKOptions(k, sort_keys)
     return call_function("select_k_unstable", [values], options, memory_pool)
+
+
+def tutorial_min_max(values, skip_nulls=True):
+    """
+    Compute the minimum-1 and maximum-1 values of a numeric array.
+
+    This is a made-up feature for the tutorial purposes.
+
+    Parameters
+    ----------
+    values : Array
+    skip_nulls : bool, default True
+        If True, ignore nulls in the input.
+
+    Returns
+    -------
+    result : StructScalar of min-1 and max+1
+
+    Examples
+    --------
+    >>> import pyarrow.compute as pc
+    >>> data = [4, 5, 6, None, 1]
+    >>> pc.tutorial_min_max(data)
+    <pyarrow.StructScalar: [('min-', 0), ('max+', 7)]>
+    """
+
+    options = ScalarAggregateOptions(skip_nulls=skip_nulls)
+    min_max = call_function("min_max", [values], options)
+
...
一切看起来都正常。现在我们可以进行提交(将我们的更改保存到分支历史中)
$ git commit -am "Adding a new compute feature for tutorial purposes"
[ARROW-14977 170ef85be] Adding a new compute feature for tutorial purposes
 2 files changed, 51 insertions(+)
我们可以使用 git log 来检查提交历史
$ git log
commit 170ef85beb8ee629be651e3f93bcc4a69e29cfb8 (HEAD -> ARROW-14977)
Author: Alenka Frim <frim.alenka@gmail.com>
Date:   Tue Dec 7 13:45:06 2021 +0100

    Adding a new compute feature for tutorial purposes

commit 8cebc4948ab5c5792c20a3f463e2043e01c49828 (main)
Author: Sutou Kouhei <kou@clear-code.com>
Date:   Sun Dec 5 15:19:46 2021 +0900

    ARROW-14981: [CI][Docs] Upload built documents

    We can use this in release process instead of building on release
    manager's local environment.

    Closes #11856 from kou/ci-docs-upload

    Authored-by: Sutou Kouhei <kou@clear-code.com>
    Signed-off-by: Sutou Kouhei <kou@clear-code.com>
...
如果我们在很久以前就启动了这个分支,我们可能需要将其 rebase 到上游主分支,以确保没有合并冲突
$ git pull upstream main --rebase
现在我们可以将我们的工作推送到 GitHub 上名为 origin 的分支 Arrow 仓库。
$ git push origin ARROW-14977
Enumerating objects: 13, done.
Counting objects: 100% (13/13), done.
Delta compression using up to 8 threads
Compressing objects: 100% (7/7), done.
Writing objects: 100% (7/7), 1.19 KiB | 1.19 MiB/s, done.
Total 7 (delta 6), reused 0 (delta 0), pack-reused 0
remote: Resolving deltas: 100% (6/6), completed with 6 local objects.
remote:
remote: Create a pull request for 'ARROW-14977' on GitHub by visiting:
remote:      https://github.com/AlenkaF/arrow/pull/new/ARROW-14977
remote:
To https://github.com/AlenkaF/arrow.git
 * [new branch]          ARROW-14977 -> ARROW-14977
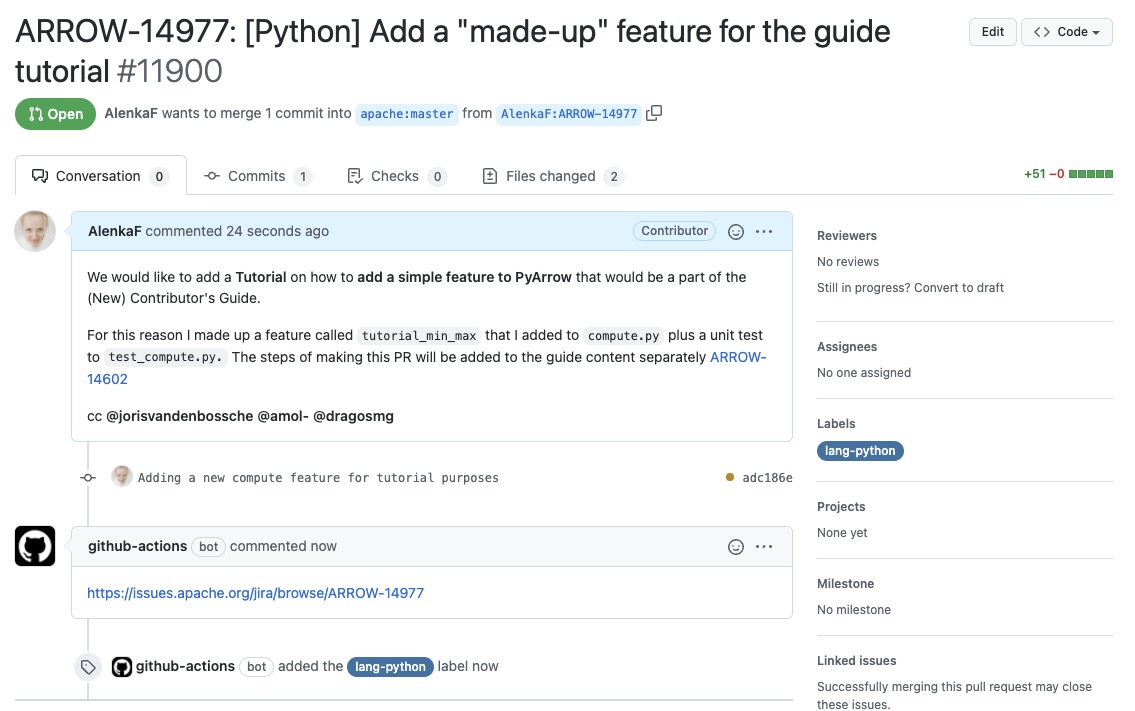
现在我们必须前往 GitHub 上的 Arrow 仓库来创建 Pull Request。在 GitHub Arrow 页面(主仓库或分支仓库)上,我们会看到一个黄色通知栏,上面写着我们最近将推送到 ARROW-14977 分支的说明。太棒了,现在我们可以点击比较和拉取请求来创建 Pull Request。
Apache Arrow 仓库上的通知栏。#
首先,我们需要将标题更改为 ARROW-14977: [Python] Add a “made-up” feature for the guide tutorial,使其与 issue 匹配。请注意,添加了一个标点符号!
额外说明:当本教程创建时,我们使用的是 Jira issue 跟踪器。由于我们目前使用的是 GitHub issue,因此标题前缀应为 GH-14977: [Python] Add a “made-up” feature for the guide tutorial.
我们还将添加描述,以便其他人清楚我们正在尝试做什么。
一旦我点击创建拉取请求,我的代码就可以作为 Apache Arrow 仓库中的拉取请求进行审查。
这就是我们的 Pull Request!#
Pull Request 与 issue 关联,CI 正在运行。一段时间后,我们收到审查意见,然后我们可以更正代码、评论、解决讨论等。我们创建的 Pull Request 可以在此处查看。
另请参阅
有关 Pull Request 工作流程的更多信息,请参阅Pull Request 的生命周期。